Tomix DE10 Conversion
This is not a conversion for the faint of heart. It is definitely not reversible.
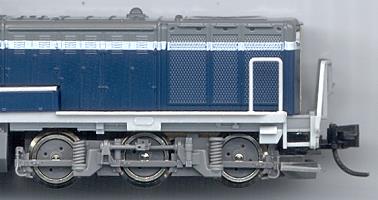
The Tomix DE10 locomotive has a highly unusual coupler pocket and action for a Rapido-type coupler. The truck-mounted
coupler can pivot up and down, but not side to side. Two tiny magnets, one at the base of the shank and the other
mounted in the truck, act as the centering spring. The coupler pocket is large, and the opening has no "lip" that
would enable it to retain the small metal "adapter" or the T-shaped shank of a typical MT-coupler.
Since adapting a new coupler to the pocket won't work, your only options are to body-mount the couplers, or
to modify the truck to allow a body-mount coupler to be attached to it. I chose the latter approach. The idea
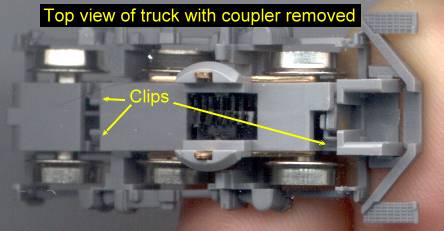
is to change the existing coupler pocket into a platform for mounting the coupler by cutting away most of the
sidewalls, then building up the interior. You must be careful not to remove the clips that hold the truck together
or the slots the plows clip to. Height is fairly critical - in addition to the need to get the coupler at the
correct height, you need to make sure there is enough clearance between the coupler and the body so that the
screw head won't interfere with operation.
- Choose a coupler and note the correct dimension for the bottom of the coupler box above the rails. I chose
2004, with a mounting height of 0.118" (3.0mm). Assemble the couplers so that you have them available for
test fitting.
- Carefully twist/pry the truck (bogie) from the body. Gently spread the sides of the coupler box to pop the coupler
out. Disassembling the truck is a little tricky - I found I could get it open by prying gently with a screwdriver at
one end while pressing the tabs inward with a small blunt tool. Be careful not to lose any of the small gears or
other pieces that may pop out.
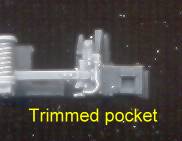 Cut and file the old coupler box to make room for the completed coupler. (The coupler won't quite fit inside it.)
You could just try to remove enough material from the inside to make room for the new coupler, but it's much easier to
just cut the side walls down. Be careful not to cut away the slot or ridge that hold the plow in place! Also,
don't remove too much of the back wall or you'll risk damaging the clips that hold the truck together. When filing
and cutting, it's also easy to nick the side frames, so there's a lot to watch out for. For the 2004 coupler, I
found I needed the side wall to be about .110" high.
Cut and file the old coupler box to make room for the completed coupler. (The coupler won't quite fit inside it.)
You could just try to remove enough material from the inside to make room for the new coupler, but it's much easier to
just cut the side walls down. Be careful not to cut away the slot or ridge that hold the plow in place! Also,
don't remove too much of the back wall or you'll risk damaging the clips that hold the truck together. When filing
and cutting, it's also easy to nick the side frames, so there's a lot to watch out for. For the 2004 coupler, I
found I needed the side wall to be about .110" high.- Cut and file some material (I used styrene sheet) to fit in and fill the old coupler box and make the
mounting platform. I needed about .080" thick material, so I used a double thickness of .040" styrene. Since the
truck is not made of styrene, you'll need to use some sort of multi-purpose adhesive such as Walthers Goo or (what
I used) Goop Household Adhesive. It doesn't have to be a super-strong bond, as the coupler mounting screw will
help secure it later.
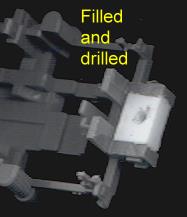 Drill and tap a mounting hole for the new coupler. This must of course be on the centerline of the truck.
When determining the correct place to drill, keep in mind that the 2004 coupler needs a small space behind it
to operate correctly. I drilled my hole about 2.5mm from the back wall of the old coupler box.
Drill and tap a mounting hole for the new coupler. This must of course be on the centerline of the truck.
When determining the correct place to drill, keep in mind that the 2004 coupler needs a small space behind it
to operate correctly. I drilled my hole about 2.5mm from the back wall of the old coupler box.- Screw the coupler to the mounting platform, then re-assemble the truck to check the coupler height. If necessary,
remove the coupler and shim or file until it's the right height, then use flush cutters to clip the screw where it
protrudes from the bottom of the truck, so it doesn't get caught on turnouts and grade crossings.
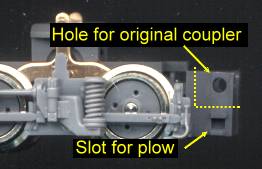
 You aren't quite done yet. Although the coupler opening in the front of the locomotive is large, it's not
open in exactly the right places. The body will rub against the new coupler box and prevent the truck from
moving freely, so it needs to be shaved down. You may want to temporarily install the truck to get an idea how much to
file or cut away.
You aren't quite done yet. Although the coupler opening in the front of the locomotive is large, it's not
open in exactly the right places. The body will rub against the new coupler box and prevent the truck from
moving freely, so it needs to be shaved down. You may want to temporarily install the truck to get an idea how much to
file or cut away.- Just reassemble the locomotive, and you're done!
Back to MT conversions main page
Back to Matthew's railroad page