Shujinkousen
Kedakasa
Shujinkoumachi
Mokidate
Mikumaji

NOTE: If you just want to see photos of the layout progress, you can skip right to the photo gallery. I've also added an update history section so you can quickly find out what's changed since the last time you were here.
When I was in Japan (spring of 1993), I had a chance to ride a Shinkansen (bullet train) from Hiroshima to Tokyo. While there, I also saw a model Shinkansen, and began to think about resuming my childhood hobby of N-scale railroading. Well, I got busy, time passed, I got married, I moved around... and eventually ended up in a home with a basement (O Joy!). So in the spring of 2000, my idea for a Shinkansen model railroad was resurrected.
The railroad took a back seat to another project but was resumed in May 2001. Since then I've added some more track and done some work on the wiring and control panel.
Unfortunately, literally hours before I was going to start the scenery shell, I found out we'd have to move. This layout was never designed to be moved, but I found a way I could cut it that made it possible. Adding any scenery, fascia, backdrops, etc would have made it harder to move, so once again this project was "on hold" for several months until our move was completed.
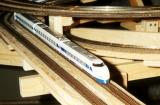
As of the middle of September 2003, I've got a complete (16-car) 100-series Shinkansen and an E3 Komachi Shinkansen model, plus one steam engine (D51 498, a 2-8-2 that ran next to the E3 during its opening). The benchwork, track, and overall shape and texture of the terrain are complete. I have begun to add vegetation.
This autumn marks the "end of the line" for the Shuji Line... we're planning to move again, and I'm going to take the opportunity to make a new layout taking advantage of the things I learned working on the Shujinkousen.
Although the prototype 100-series runs much farther south, the terrain will be (very) loosely based on Akita prefecture, in the far northwest part of Honshu (the main island). I may include a cedar forest, and there will definitely be at least one high waterfall, probably near Mikumaji. One of the stations will include a statue of Shuji, similar to the Hachiko statue at Shibuya station. I also intend to create something like the "Young Hachiko and His Friends" statue from Odate station.
The Names
Shujinkousen |
(Shoo-jean-koh-sen) Literally, "Hero line" - but note that this is "hero" as in "protagonist", not "heroic person". The line is named after a noble dog, EBA-no Shujinko-go, aka Shuji. This is the name of the train layout, but I often shorten it to "The Shuji Line". |
Kedakasa |
(Keh-dah-kah-sah) The name of the Shinkansen service between Shujinkoumachi and Mokidate. It means "nobility". |
Shujinkoumachi |
(Shoo-jean-koh-mah-chee) Our dog's name again, this time with a suffix for "town" rather than "line". I'm prone to just calling this city "Shuji". |
Mokidate |
(Mo-key-dah-teh) This name includes some word play. The "mo" means "dense growth", and is usually combined with "rin" ("forest") in a word meaning "dense forest". I have combined it with "ki" ("tree"), creating a word for "a dense forest of one tree". Moki is the name of another Akita dog. The "date" suffix means "palace", and appears in some place names. |
Mikumaji |
(Me-koo-mah-jee) "Mi" is a character for "enchant" or "charm", and "kuma" means "bear". "Ji" is a suffix used in temple names. Akita dogs are sometimes called Japanese Bear Dogs, because they look a little like bears, and because they were originally bred to hunt bear and other large game. |
Phase Two - The slot cars
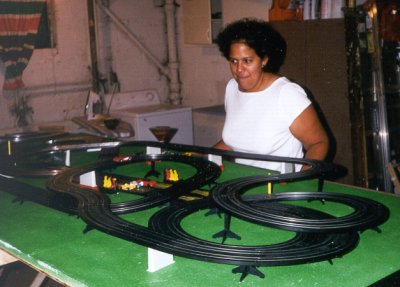
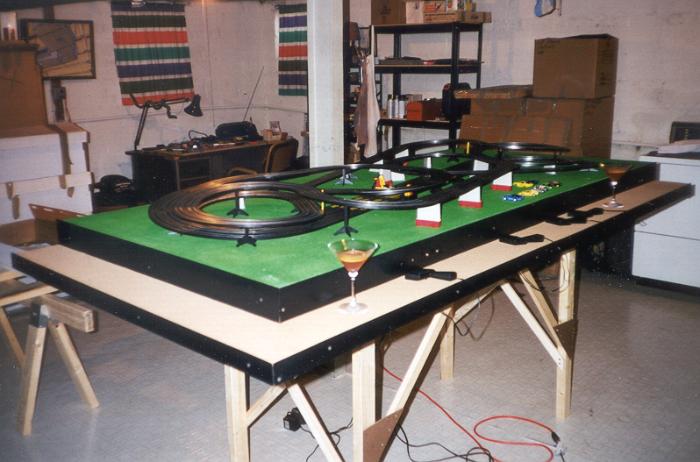 As an easy way to practice my benchwork and electrical skills, I set up our 4-lane HO slot car set on a newly built bench. The bench is a basic L-girder rectangle (4'x8'), with a 6" sunken shelf along two sides. The shelf is lined with cork and provides a surface for placing your cocktail while racing.
This was an important part of the railroad project. The benchwork is far from perfect, but it serves its purpose well - the cars are on a steady table, and I learned a heckuva lot from the experience. Besides, it's something my other half enjoys, too!
Phase Three - Design
I'm more of a modeler than a train operator, so my objective in designing the layout was to provide an interesting setting for a Shinkansen train to run about in. I think of my layout as more of a dynamic diorama than a model railroad. I knew I wanted a length of visible double track, both rural and urban/suburban platforms, a river crossing, and tunnels.
I opted for basically a dog-bone circuit, with the middle part consisting of mostly double track, and my stations at the two ends. In order to accomodate a full-length Shinkansen (for the future - it's only six cars now), the Shujinkoumachi station will include a covered portion that descends on a helix to a hidden under-layout fiddle yard with a reversing loop. See the Track Plan for drawings.
The reversing loop and a crossover are the only interesting operational points here - but keep in mind that it's not really designed for operations. There's a side benefit, too - I save a lot of money by having only three turnouts on the surface layout!
The bench is basically a 3'x6' section for Shujinkoumachi and the climb into the mountains, approximately 6' of double track through the mountain pass (the layout is only 1' wide through this), and a 3'x2' section for Mokidate. The mountain section is angled for interest and to get the Mokidate section even with the Shujinkoumachi section.
 The benchwork is all L-girder construction, and I'll be building ribbon roadbed on risers. Mokidate is about 2.5" higher than Shujinkoumachi, but the rail will go higher than that in the mountain area. I'm using a lot of helices and circles in tunnels to avoid having extremely sharp visible curves. In the mountains near Mokidate, I've even designed the track to extend through the backdrop to turn back. See the Benchwork page for images.
Phase Four - Building the benchwork
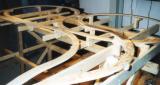
The benchwork was completed 24 September 2000. It's all L-girder construction. The L-girder construction, in conjunction with a fair amount of bracing, have allowed me to use small dimensional lumber - it's almost entirely 1x2 lumber, with a few 1x3's for long joist spans, and 2x2 legs, but it is extremely rigid and strong.
Phase Five - Building the subroadbed
 The subroadbed was completed in October 2000. It's sort of a hybrid cookie-cutter/ribbon subroadbed, with 1/8" Masonite sections for overpasses (to provide better clearance). Large or complex sections of the subroadbed were formed by mapping them onto plywood and cutting them out with a saber saw; simpler portions were built by splicing cut out sections together. See the Subroadbed page for images.
After track was laid and I was able to run trains, I discovered that perhaps some of my grades were a tad too ambitious. The trains could navigate the layout, but in some cases just barely. So, rather than risk excessive wear on the motors, I decided to make some adjustments. Well, the open design of my benchwork and subroadbed really proved its worth! It was a simple matter to unscrew risers, adjust the track to where I wanted it, and reattach the risers in their new positions. In the course of a few short evenings I was able to adjust my grades to be as gentle as possible, while still providing precisely enough clearance under overpasses.
Phase Six - Laying the track
The cork roadbed installed quickly and easily and I've laid the track. The track is MicroEngineering Code 55 flex track and turnouts, except one special turnout that I had to get from Peco because ME doesn't offer the style I wanted. The track is fastened to the cork roadbed with Liquid Nails glue.
I started with the three turnouts on the Shujinkoumachi side of the layout, which needed to go down first because their placement must be most precise. A side benefit was that the hardest work got done first! This area involves the only turnouts, complex wiring, and insulated rail joiners on the layout, and has one of two required transitions between types of rail (from the Peco turnout to the ME flex track - the other will be where the ME has to transition to Atlas for the fiddle yard).
 Back in November, I went ahead and wired the turnouts and a bit of track, and I was able to run an engine back and forth over a few feet of track. Not much, but pretty thrilling to see progress after the months of work! Unfortunately, I had seen and wired for the reversing loop through Shujinkoumachi but failed to notice that the spur track (down to the fiddle yard) introduced a problem. Where I'd put the feeders created a short circuit when I switched the spur turnout!
So I had a bit of a setback as I had to disassemble that part of the railroad and put it back together - this time, correctly! After that was done, the rest of the tracklaying went quickly.
Ultimately, I decided not to build the under-layout fiddle yard. I only have two trains (with no plans for more within the lifetime of this layout), so all I really needed was a siding long enough to hold the 16-car 100 series model, about 8 feet (2.4 meters). I built this instead of the helix down to the second level.
Phase Six Point Five - Moving
At the end of August 2001, I needed to move the layout from one residence to another. The layout had not been designed to be moved, so this required a little investigation and creativity. I did find a place in the mountain pass area where the subroadbed was already spliced anyway, and I could easily separate the layout into two sections by simply cutting the rails with my Dremel tool and unscrewing the subroadbed from some risers.
I did this and removed the legs, giving me a (relatively) mobile layout. But on moving day I found out the larger section (Shujinkoumachi) still had a section that protruded too far to successfully navigate the basement stairs. After a little consideration, I determined that I could shorten that bit considerably by cutting away the ends of some joists, so that I wouldn't need to cut any more track. So I did this on the spot, and proceeded to move the layout (now in 3 pieces plus legs).
During reassembly, I took the opportunity to remove the platform for the under-layout fiddle yard that I now knew I would never build. This got me some extra plywood and opened up the space under Shujinkoumachi for better bracing on the legs.
I learned a few lessons from this experience:
 The scenery shell was constructed of plaster-impregnated gauze laid over a cardboard support. This proved to be an easy and relatively mess-free construction method. The gauze is available from medical supply warehouses; I got a case for about $50 (USD), and that was just enough to do my layout. You just cut a hand-sized piece of material, dip it in water for about 5 seconds, and lay it on the support structure, smoothing out the plaster with your finger where the pieces overlap.
With the removal of the under-layout fiddle yard and its platform, I needed a new place for the throttle control. I built a small shelf and control panel area near Shujinkoumachi to support this (see the scenery page for photos).
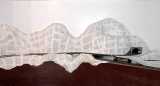
The backdrop is made of foam core board, glued to wooden supports attached to benchwork joists.
The fascia is about 12" deep at the Mokidate (mountain/rural) end of the layout, and about 8" deep at the Shujinkoumachi (city) end of the layout. The bottom of the fascia is level, so the rise going into the mountains is more visible now. The top of the fascia follows the contours of the terrain, so it is fairly rugged in the mountain pass. The fascia itself was cut from thin wood wall paneling, which offered an excellent combination of price, ease of cutting, and flexibility. The unfinished side of the veneer faces out, and will be painted later.
The shell is colored and textured with fairly typical scenicking techniques, such as latex paint and ground foam. I forested a tiny area just to see how it would look, using lichen and ground foam.
Phase Infinity - The End of the Line
It's been a fun three years working on this railroad, but it's time to move on. We're moving our residence again, and it's just too much trouble to bring the Shuji Line with us. I learned a few lessons along the way: